Safe and Effective Paint Removal Methods for Laminate Cabinets: How To Remove Paint Off Laminate Cabinets
:max_bytes(150000):strip_icc()/clean-and-shine-laminate-floors-1901095-07-600c4b109acc43e1bf3da57849540e3b.jpg)
Ah, the joys of DIY! You’ve bravely embarked on a kitchen renovation, only to discover that your carefully chosen paint job on those laminate cabinets is… less than stellar. Fear not, intrepid decorator! Removing paint from laminate cabinets can be achieved without resorting to demolition-level mayhem. With the right approach, you can restore your cabinets to their former glory (or at least, a less paint-splattered glory).
Paint Removal Methods for Laminate Cabinets, How to remove paint off laminate cabinets
Choosing the right method is crucial, as laminate is a delicate beast. The wrong approach can lead to scratches, chipping, and a whole world of regret. Below, we present three options, each with its own set of advantages and disadvantages. Remember, always test any method on an inconspicuous area first to avoid unexpected outcomes that could make your cat laugh.
| Method | Tools Needed | Steps Involved | Precautions |
|---|---|---|---|
| Chemical Paint Stripper | Paint stripper (choose one specifically designed for laminate), safety glasses, rubber gloves, putty knife or scraper, paintbrush (for applying stripper), rags or drop cloths, ventilation | 1. Apply stripper according to manufacturer’s instructions. 2. Allow sufficient dwell time. 3. Carefully scrape away softened paint. 4. Repeat as needed. 5. Clean thoroughly with a solvent appropriate for your stripper. | Work in a well-ventilated area. Avoid skin contact. Follow manufacturer’s safety instructions meticulously. Improper use can lead to serious injury and damage to the laminate. Dispose of chemicals responsibly. |
| Heat Gun | Heat gun, scraper, safety glasses, drop cloths, putty knife | 1. Direct heat gun onto painted surface. 2. Use scraper to remove softened paint. 3. Be careful not to overheat the laminate. 4. Work in small sections. | Extreme caution is needed to avoid burning yourself or damaging the laminate. Maintain a safe distance from the laminate surface to prevent overheating. This method requires a steady hand and patience. |
| Sanding | Sandpaper (various grits), sanding block, safety glasses, dust mask, drop cloths | 1. Start with a coarser grit sandpaper, gradually moving to finer grits. 2. Sand in the direction of the wood grain (if visible). 3. Regularly clean the sandpaper to remove debris. 4. Be very gentle to avoid scratching the laminate. | This is the most time-consuming method. Excessive sanding can damage the laminate. Use a dust mask to avoid inhaling sanding dust. This method is generally only suitable for thin layers of paint. |
Advantages and Disadvantages of Each Method
Let’s delve into the pros and cons of each paint removal strategy. Think of it as a carefully orchestrated battle between your paint and your sanity.
Chemical paint strippers offer speed and effectiveness, especially for thick layers of paint. However, they come with a hefty dose of chemical hazards and potential damage to the laminate if not used correctly. The cost is moderate, but the time commitment is relatively low.
Heat guns are relatively quick, but require a skilled hand to avoid burning the laminate. The cost is low, but the potential for damage is high if you’re not careful (imagine a singed cabinet – not a good look). Time commitment is moderate.
Sanding is the safest option, minimizing the risk of laminate damage. However, it’s incredibly time-consuming and may not be suitable for all paint types or thicknesses. The cost is low, but the time commitment is exceptionally high. This method is best suited for light paint removal.
Detailed Process for Using Chemical Paint Stripper
Before you embark on this chemical adventure, remember: safety first! This is not a mission for the faint of heart (or those with sensitive noses).
- Ensure adequate ventilation. Open windows and doors, and consider using a respirator if necessary.
- Protect your skin and eyes. Wear rubber gloves and safety glasses.
- Apply the paint stripper using a brush, following the manufacturer’s instructions carefully. Don’t skimp on the stripper – a generous application is key.
- Allow the stripper to dwell for the recommended time. Don’t rush this step; patience is a virtue (especially when dealing with stubborn paint).
- Carefully scrape away the softened paint using a putty knife or scraper. Work slowly and gently to avoid damaging the laminate.
- Clean the area thoroughly with a solvent recommended by the manufacturer.
- Dispose of all materials properly, following local regulations.
Dealing with Stubborn Paint and Potential Damage

Ah, the joys of DIY! Removing paint from laminate cabinets can be a surprisingly dramatic affair, a bit like a tense standoff between you, your scraper, and a particularly stubborn coat of paint. Sometimes, however, the battle leaves behind a few… battle scars. Let’s delve into the strategies for dealing with those tenacious paint residues and the occasional mishap.
How to remove paint off laminate cabinets – The removal process can be challenging, especially when dealing with stubborn paint or delicate laminate surfaces. A careful approach is crucial to avoid causing further damage. Understanding the properties of different paints and utilizing appropriate removal techniques are key to a successful outcome. This section will provide guidance on tackling these challenges and restoring your cabinets to their former glory (or at least, a slightly less paint-splattered glory).
Comparison of Paint Remover Effectiveness
Choosing the right paint remover depends heavily on both the type of paint and the sensitivity of your laminate. A heavy-handed approach with a heat gun on delicate laminate is a recipe for disaster, akin to using a sledgehammer to crack a nut (unless you’re really, really angry at the nut).
- Chemical Removers vs. Oil-Based Paint: Chemical strippers, especially those designed for oil-based paints, are generally effective but require careful application and ventilation. They often work by breaking down the chemical bonds in the paint, allowing for easier removal. However, some chemical strippers can damage laminate if left on too long.
- Heat Gun vs. Water-Based Paint: A heat gun can soften water-based paints, making them easier to scrape off. However, excessive heat can damage the laminate, causing bubbling or discoloration. Think of it as a delicate dance; too much heat, and the laminate might “burn its toast.”
- Mechanical Removal (Scraping) vs. Multiple Paint Layers: Scraping is effective for removing loose paint but can scratch the laminate if done aggressively. Multiple layers of paint might require a combination of chemical and mechanical removal for best results. This is like peeling an onion – multiple layers require patience and the right tools.
Laminate Scratch Repair
Accidents happen, even to the most careful DIY enthusiast. Minor scratches are often unavoidable during paint removal. Fortunately, many can be repaired relatively easily.
Remember, prevention is always better than cure. Take your time and use the appropriate tools and techniques to minimize the risk of damage.
For minor scratches, a touch-up pen or marker designed for laminate can often work wonders. Choose a color that closely matches your cabinets. For deeper scratches, a laminate repair kit containing a filler might be necessary. Follow the kit’s instructions carefully. Remember to apply thin coats and allow adequate drying time to prevent uneven surfaces.
If the damage is extensive, you might need to consider replacing the affected cabinet door or panel. This is less of a repair and more of a strategic retreat.
Preventative Maintenance Plan
Prevention is key to keeping your cabinets paint-free and looking their best. A little proactive maintenance goes a long way.
- Regular Cleaning: Wipe down your cabinets regularly with a damp cloth and mild detergent to prevent dirt and grime buildup. This keeps the surface clean and prevents paint from adhering as easily.
- Protective Coating: Apply a clear protective sealant to your cabinets after cleaning. This creates a barrier that can help prevent paint spills from sticking. It’s like giving your cabinets a superhero shield.
- Careful Handling: Be mindful of what you place near your cabinets. Avoid placing paint cans or other potentially messy items directly on the cabinets.
- Immediate Cleanup: If a paint spill does occur, act quickly! The sooner you clean it up, the easier it will be to remove. Speed is of the essence; it’s a race against the setting paint.
Alternatives to Paint Removal and Cabinet Refinishing
Let’s face it, stripping paint from laminate cabinets is about as appealing as a root canal without anesthesia. Thankfully, there are less teeth-grindingly stressful options for sprucing up your kitchen’s aesthetic without resorting to chemical warfare. These alternatives offer a range of cost and effort levels, allowing you to choose the perfect fit for your budget and DIY skillset. Prepare to be amazed by the transformative power of a little creativity (and maybe some elbow grease).
The following options provide viable paths to kitchen cabinet rejuvenation, each with its own unique set of advantages and disadvantages.
Alternative Cabinet Refinishing Methods
Sometimes, the most straightforward approach is the best. Below, we explore three distinct methods for updating your laminate cabinets without the arduous task of paint removal. Each method offers a different balance of cost, durability, and visual appeal, ensuring there’s a perfect solution for every homeowner.
- Repainting
- Using Cabinet Wraps
- Applying a Decorative Finish
Comparison of Alternative Cabinet Refinishing Methods
To aid in your decision-making process, let’s compare these three methods across key factors: cost, durability, and aesthetic appeal. This table provides a concise overview, allowing you to weigh the pros and cons of each approach.
| Method | Cost | Durability | Appearance |
|---|---|---|---|
| Repainting | Moderate (depending on paint quality and quantity) | Moderate to High (depending on paint type and preparation) | Highly Customizable; can achieve a wide range of looks |
| Cabinet Wraps | Low to Moderate | Moderate (susceptible to peeling or damage with improper application) | Wide selection of colors and patterns; can mimic wood grain |
| Decorative Finish (e.g., decoupage, stenciling) | Low to Moderate | Low to Moderate (depends on the finish and application) | Highly Unique and Customizable; allows for creative expression |
Refinishing Cabinets Using Cabinet Wraps: A Visual Guide
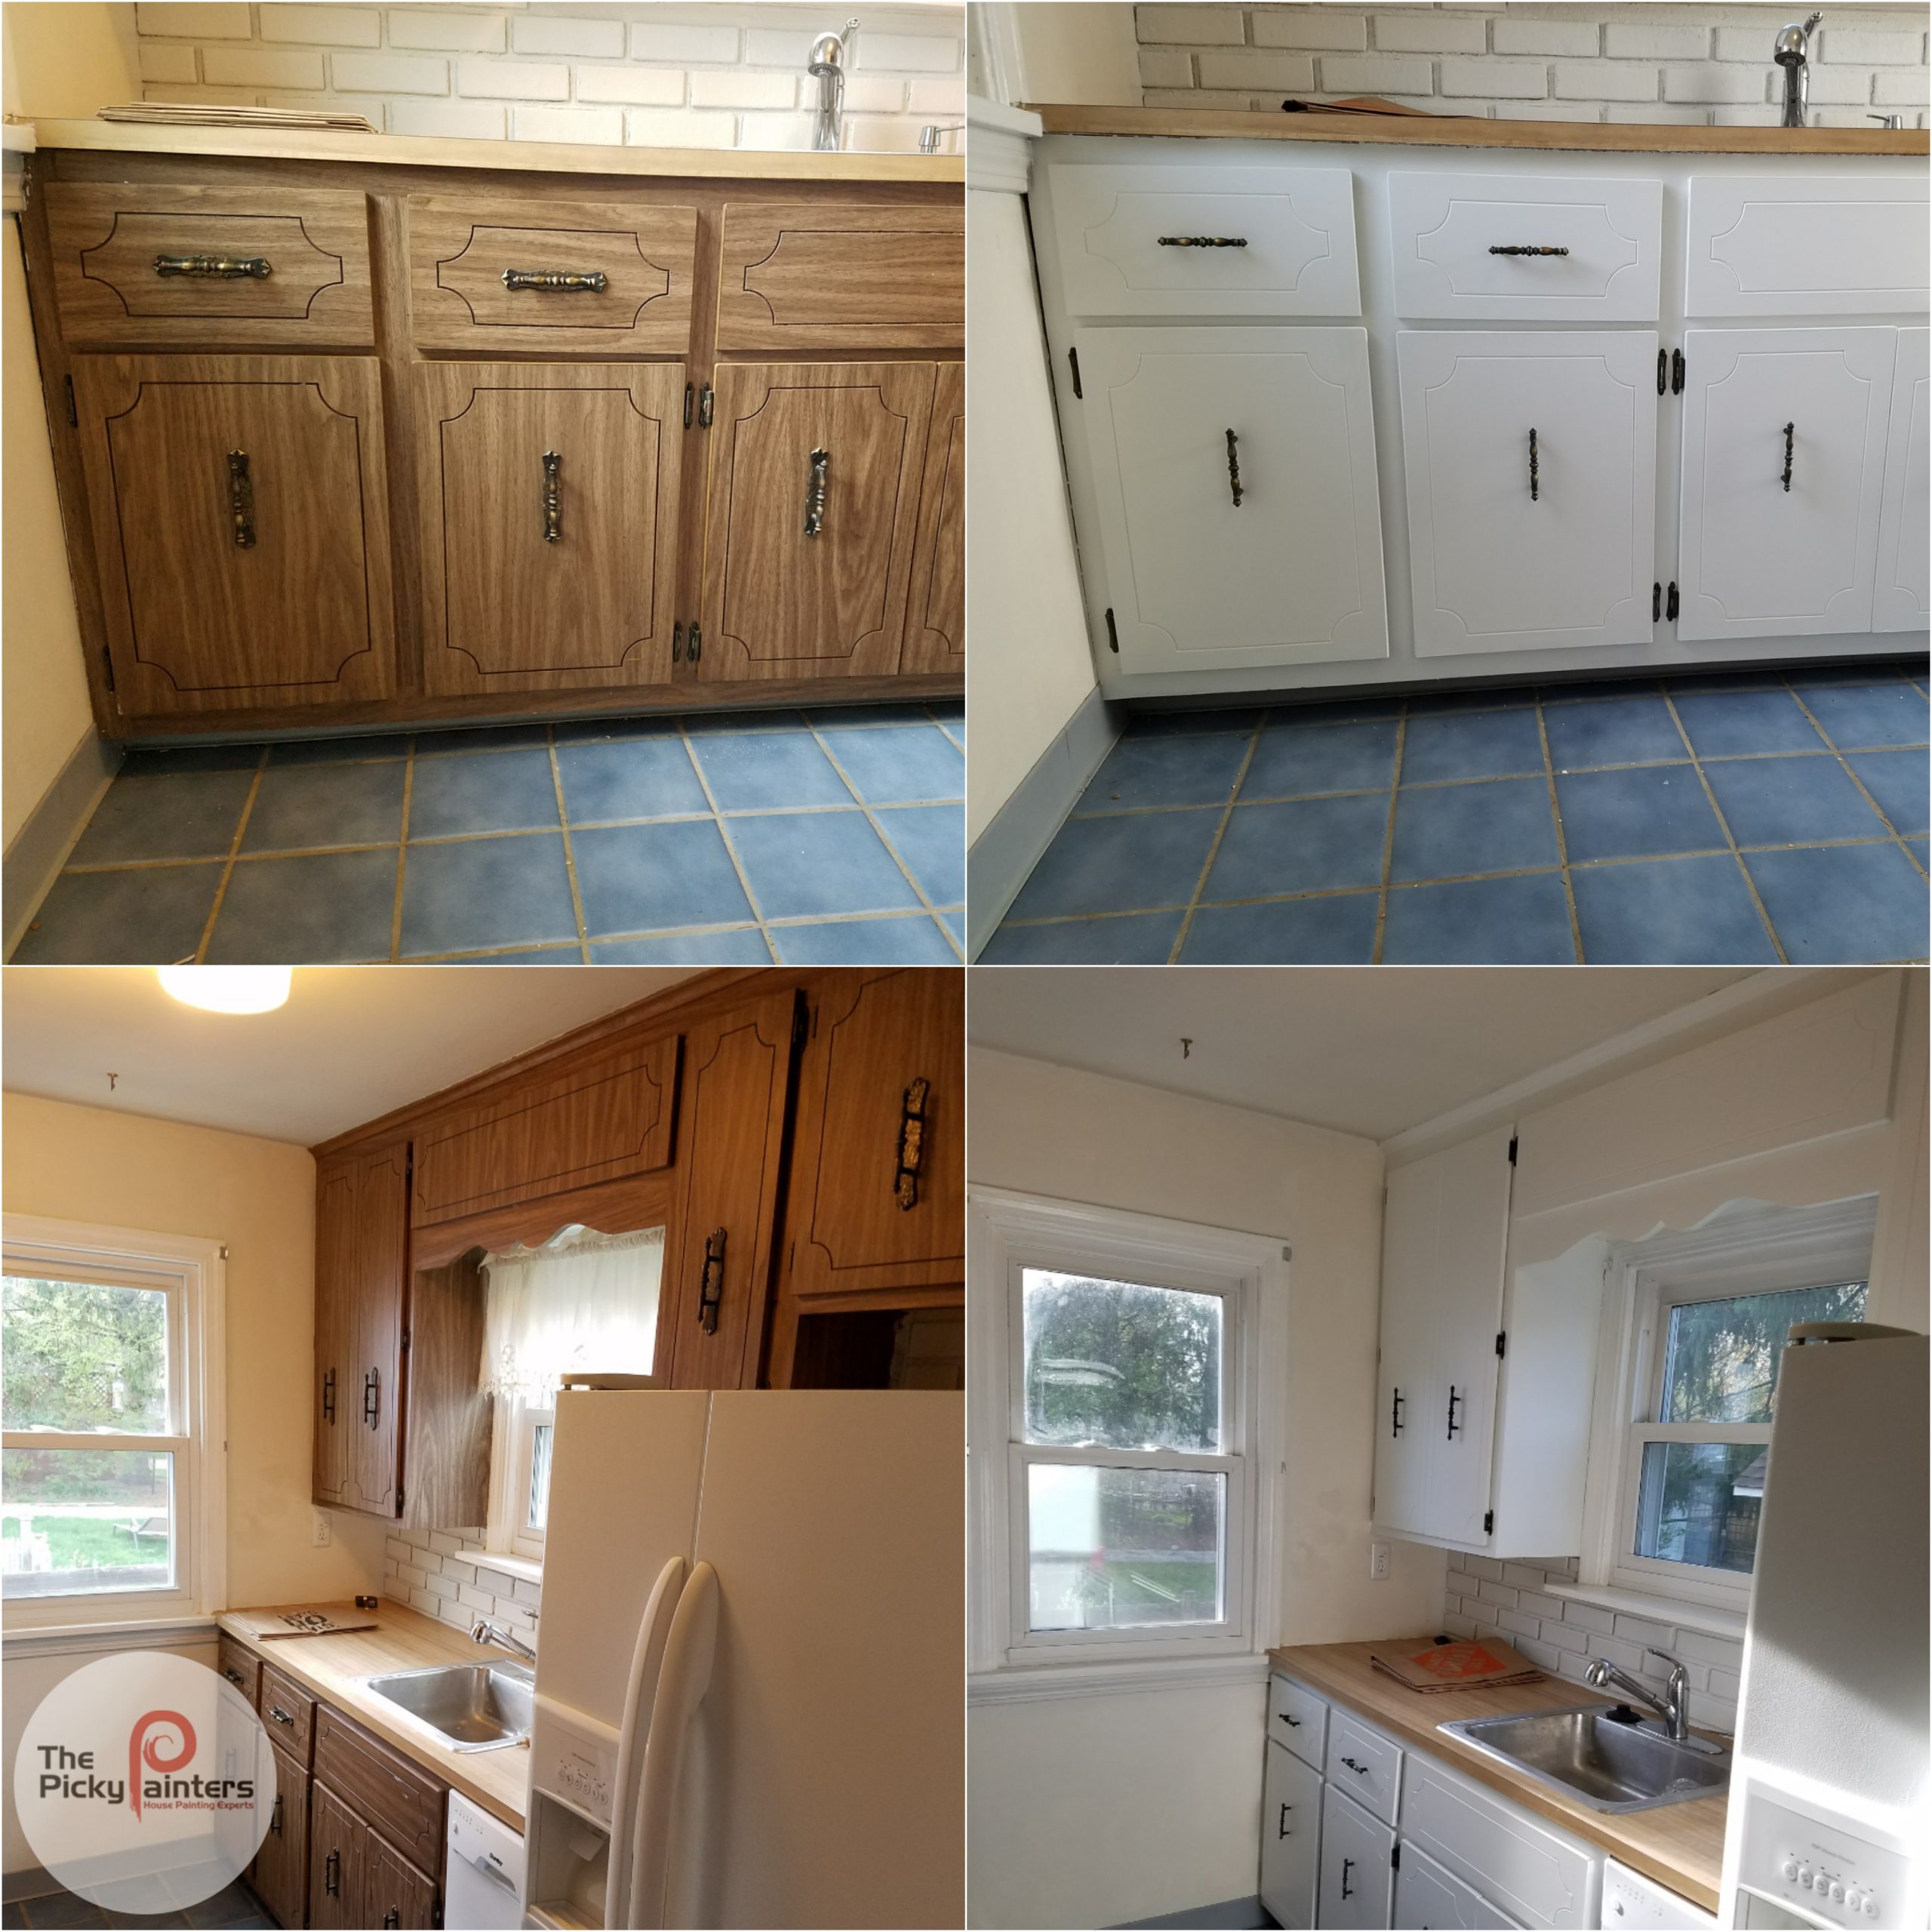
Let’s imagine a transformation using cabinet wraps. This method is a fantastic option for a budget-friendly update that delivers impressive results. Consider a kitchen with outdated honey-oak laminate cabinets. The homeowner decides on a sleek, matte white wrap to modernize the space.
Materials: The project requires cabinet wrap rolls (enough to cover all cabinet surfaces), a measuring tape, scissors or a utility knife, a smoothing tool (like a plastic squeegee or credit card), and a soft cloth for cleaning. Optional additions include a heat gun for tighter corners and a spray bottle with soapy water to help position the wrap.
Steps: First, the cabinets are thoroughly cleaned to remove any grease or dirt. Then, precise measurements are taken for each cabinet door and drawer front. The wrap is carefully cut, leaving a few extra inches for overlap and trimming. The soapy water solution is sprayed onto the cabinet surface, allowing the wrap to be easily positioned and repositioned for perfect alignment. Using the smoothing tool, the homeowner works from the center outwards, pressing out any air bubbles or wrinkles. Excess wrap is trimmed with a utility knife, ensuring a clean, professional finish. The process is repeated for each cabinet door and drawer front.
Final Result: The once dated honey-oak cabinets are now transformed into a modern, crisp white. The matte finish provides a sophisticated touch, brightening the kitchen and creating a more spacious feel. The entire project, from start to finish, took a weekend and cost less than $100. The result is a stunning kitchen update achieved without the hassle and expense of paint removal.

